

Accent Planks Installation Instructions
This material is intended for interior use only and is not designed for use around heated surfaces or open flames (can be installed around a code-approved fireplace). It can be used in high moisture areas (bathroom / kitchen / laundry). Avoid hanging heavy items on planks without using wall anchor(s) or securing hardware to wall stud(s) as planks are designed to be decorative only. Do not hang over beds or on wallpaper, unless using adhesive or nails.
1. Determine Necessary Quantity of Accent Planks: Measure the wall or room to determine required square footage (length x height). Determine number of cartons to purchase by dividing total square footage to be covered by 15, then rounding up.
2. Acclimate Planks: Place Accent Planks in installation location at least 24 hours prior to installation to adjust to room temperature. Use indoors only between 50° – 105°F.
3. Wall Preparation: Accent Planks are intended to be installed over suitable noncombustible backing such as gypsum board.
a. Command® Picture Hanging Strips from 3M™(supplied) or Construction Adhesive: Clean wall with isopropyl rubbing alcohol. Do not use household cleaners. Ensure wall surfaces are firm, dry and free of contaminants. Sand high spots to ensure flat working surface to minimize plank distortion.
Note: Wait 7 days after painting before using Command™ Picture Hanging Strips.
b. Finishing Nails (4d or 6d recommended): Sand high spots to ensure flat working surface.
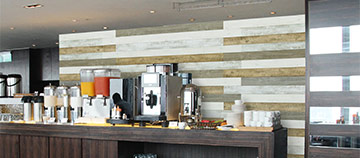
4. Select Installation Orientation: Accent Planks can be installed horizontally, vertically or at an angle (i.e. herringbone). Arrange planks side-by-side in open area to achieve desired balance of color and pattern. Grain patterns can be oriented in same direction or opposing patterns.
5. Fitting the Accent Planks: Begin in a top or bottom corner of the room. Using a level and pencil, draw line along wall to use as a guide to ensure the starter row of planks is level. Install the first plank against inside corner (see Fastening Options below) and trim as needed to allow plank to fall on the level line. Set adjoining planks at varying lengths leaving a 1/32” gap between planks to allow for expansion. Continue until row is complete. Offset the second row 6-12” or as desired to achieve an appropriate design. Repeat until area is covered.
Note: Accent Planks can be trimmed using chop saw, table saw or fine tooth miter box-type saw. Use quick cuts with fine tooth blade to ensure a clean cut. A table saw is recommended to make rip cuts (lengthwise cuts to trim to a narrower width).
6. Fastening Options: Secure Accent Planks using Command Picture Hanging Strips from 3M™, construction adhesive, and/or finishing nails.
Note: Failure to follow instructions carefully may cause damage.
a. Command™ Picture Hanging Strips from 3M – Clean the surface with isopropyl rubbing alcohol. Do not use household cleaners.
Separate the strips. Press two strips together until they click.
Remove one green liner from the pair and firmly press onto the backside of the plank. Repeat, applying pairs of strips to both ends of the plank and in the middle if over 2.5 feet.
Remove the remaining green liners and press the plank directly onto the wall surface. Press firmly for 30 seconds, applying pressure at each strip to ensure adequate adhesive contact.
Note: Additional Command™ Picture Hanging Strips from 3M may be used for securing planks and are available from many local retailers.
To make small adjustments to the planking, carefully lift the bottom of the plank, pulling up and away to expose the separated fasteners. Do not pull straight off. Adjust, then push the plank back onto the fasteners and push at each strip until you hear a click.
To completely remove, follow the instructions above to remove the plank. To remove the strip, grip the tab and slowly stretch the strip straight down against the wall until it releases (about 12 inches). Do not pull the strip towards you.
b. Construction Adhesive – Use low-VOC construction adhesive, suitable for plastic, for Accent Plank installation. Follow supplier recommendations for installation.
c. Finishing Nails – 4d or 6d finishing nails are recommended for installation. Drive nails to within ¼” of plank surface to prevent scarring the face. With an appropriate nail set, drive nails flush or below the surface of the plank as preferred. Alternatively, a pneumatic nail gun set at 95psi or lower may be used to install planking. Avoid nailing close to the edge of the plank due to possibility of material cracking.
Note: Damage to underlying wall surface may occur using application methods b and c.
7. Care and Maintenance: Accent Planks are practically maintenance-free and painting is not recommended (laminate will not accept paint). Occasional cleaning and touch-up may be required.
a. Cleaning: A mild soap solution on a damp cloth is recommended. Wipe dry immediately. For any cleaning solution, test in an inconspicuous area first before using.
b. Touch-up: Since Accent Planks are prefinished, simply touch up nail holes and joints with color-coordinated non-oil-based putty, caulk, shoe polish, latex stain, marker or crayons.
The user is responsible for proper installation of this product. If not specifically covered by these instructions, product must be installed in accordance with generally accepted good design and construction practices. Inteplast Group Building Products does not warrant Accent Planks and cannot be held responsible for loss or damage arising from this product or as a result from improper use or installation of this product.
3M and Command are trademarks of 3M