


STORAGE & HANDLING
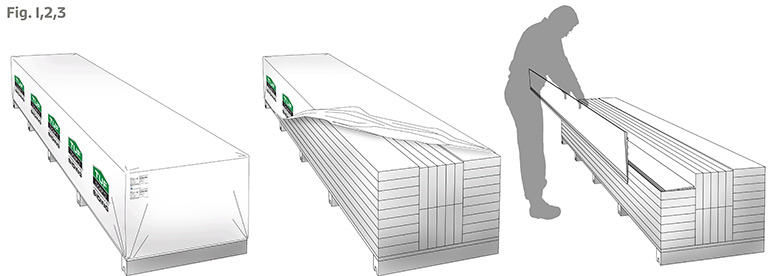
1. SIDING products are shipped from the manufacturer in a protective shroud covering. If the protective covering has been torn or removed, ensure that SIDING is covered properly to keep it free of dirt and debris at job site and at dealer/warehouse. If SIDING gets dirty, clean after installation. (see Fig. 1 and Fig.2)
2. Always store SIDING on a flat and level surface; preferably with shaded coverage, whenever possible.
3. Do not store SIDING in any location where ambient temperature may exceed 120° F (e.g. on blacktop pavement, or under tarps, etc.,). Keep away from heat sources.
4. Always carry SIDING on edge to prevent excessive sagging and to minimize damage.
5. Inteplast Group (IPG) will not be responsible for damage caused by improper storage or handling.
GENERAL REQUIREMENTS
1. SIDING will expand and contract with changes in temperature. Be sure to follow the SIDING Installation Guidelines.
2. Do not install SIDING over open framing. Install it over proper solid sheathing, such as plywood and OSB, etc., in compliance with the local Building Codes.
3. Irregularities resulting from framing sheathing can telegraph through the finished application. Inspect for irregularities prior to installing SIDING.
4. SIDING is designed as a rainscreen to reduce the amount of water that reaches the underlying weather resistant barrier. SIDING is not a watertight barrier.
5. Always apply SIDING over a properly installed weather resistant barrier system incorporating house wrap, comply with national and local Building Codes.
6. IPG assumes no responsibility for water infiltration. All openings must be sealed, caulked or flashed properly to prevent moisture intrusion or buildup.
STARTER STRIP INSTALLATION
1. A special 3 1/2” wide metal starter strip for the SIDING is designed to be used.
2. Establish a straight and level chalk line around the entire structure as a reference for siding, and to guide the placement of the starter strip and courses of SIDING, the use of a laser level is HIGHLY recommended.
3. Install the top of starter strip along the chalk line, fasten tightly to the wall approx. every 8” and to every available stud with the fastener penetrating the substrate at least 1”.
SIDING INSTALLATION
1. Cut SIDING using standard carbide tip circular or miter saws with a trim or plywood blade. Avoid using fine tooth blades. Jig saw, rotary tools (such as router) can be useful for cutting around obstructions.
2. Use moderate downward hand pressure inserting the groove of SIDING onto the tongue of starter strip as well as the previously fastened course. Do not use excessive force (e.g. hammers, tapping blocks, etc., see Fig. 9).
3. To accommodate natural expansion and contraction of SIDING:
• Do not drive head of fastener tightly against nailing slot. Leave 1/32” between fastener head and nailing slot (see Fig. 10).• Horizontal siding panel cuts must leave no less than a 3/8” gap to engage the lock. Tight nailing will cause SIDING to buckle with changes in temperature.
• Center fasteners in the nailing slots.
• Drive fasteners straight and level.
• Never pin the SIDING (e.g. never face nail SIDING).
• Secure top course or ripped panels by placing a nail along the top of the cut to allow the head of the fastener to hold back the panel.
• Center pin every siding course over 12” long (not each panel) to distribute expansion and contraction to both sides (see Fig. 11).
• Penetrations such as water faucets or gas lines can be used as the center course pinning point. Use vinyl fixture mounts when possible.
• When using window and door trim around windows and doors, corners should be mitered. Glue and screw these miters.
5. Fasten the SIDING a maximum of 16” apart and to every available stud with the proper fasteners recommended. 6D Stainless Steel or hot dipped Galvanized Nails. (When necessary, use proper router to create siding slot for optimal positioning with stud.)
Assembly of butt joints should not be attempted below 40°F and/or when rapid temperature drops are anticipated. Offset the butt joints course to course at a minimum 16” for the best appearance.
Avoid placing joints at the top or bottom of windows & doors. SIDING ends (butt joints) should be butted tightly with the recommended PVC trim and siding adhesives.
Leave proper space away from all trim details: corner trim, window and door trim surrounds. For best results use TRIM and CORNER BOARD which have rabbited edges to conceal siding ends as well as the natural expansion and contraction of SIDING.
INTE-LOCK INSTALLATION
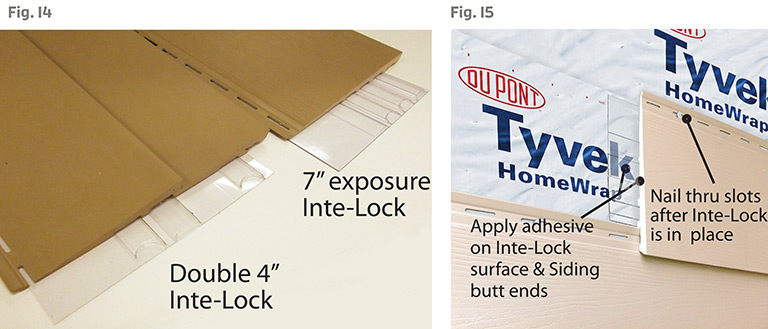
1. Use the Inte-Lock (4”x6” clear Sheet) to minimize gaps caused by expansion and contraction. There are two types: Inte-Lock for 7” exposure and Double 4” Siding.
2. Use the suggested PVC trim and siding adhesives to install the Inte-Lock to the Siding panel.
a. Apply adhesive to half the Inte-Lock and slide behind the previously installed siding panel.
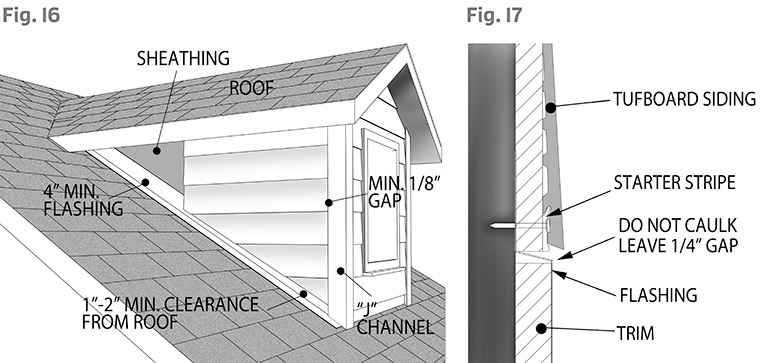
b. Apply adhesive to the other half of the Inte-Lock and on the butt end side of the siding panel
c. Install the adjacent siding panel on the other half of the Inte-Lock using moderate hand pressure to ensure adhesion
FASTENING OF TRIM
1. Please refer to The TRIM Installation Guidelines
2. Use the following schedules for proper fastening of trim:
a. No more than 2” from the end of the board.
b. No further apart than 16” on center, along the length.
c. No further apart than 4” on center, along the width.
d. If a J-Channel trim is used, do not nail through the J-Channel.
3. Use exterior grade, smooth shank nails. Exterior grade screws are also acceptable. Pre-drilling of nail hole is required to avoid cracking in colder temperature, 32°F or below.
INSTALL SHUTTERS, CABLE MOUNTS
1. Make sure the screw hole in the SIDING is ¼” larger in width than the attachment screw diameter (e.g. a 1/8” screw requires a 3/8” hole in width on the SIDING), This allow for natural expansion and contraction of SIDING.
2. Never attach fixtures directly to SIDING.
3. Fasteners of fixtures must penetrate the solid structure.
CLEARANCE
1. Provide a minimum of 1” clearance above any surface where water may collect, such as roof’s porchs, decks, patios, and walks, etc.
2. Maintain a ¼”clearance between SIDING and the horizontal joint that is above the flashing.
3. Install SIDING in compliance with local Building Codes requirements for clearance between the bottom edge of panel/framing and the adjacent finished grade.
FLASHING
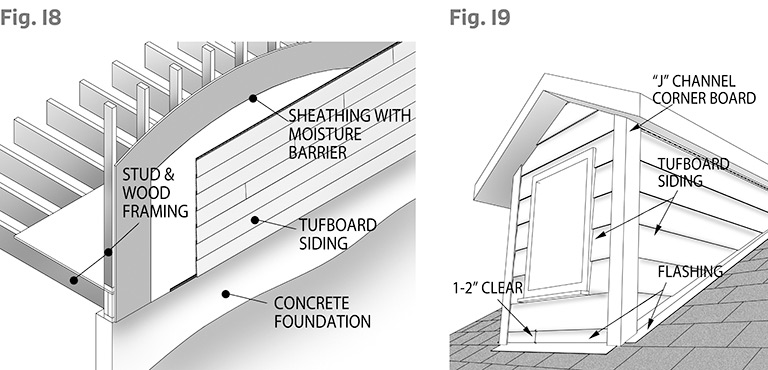
1. Using non-corrosive materials, install flashing around all doors, windows, rakeboards, chimneys, and other needed areas. Drip cap flashing above all openings will help ensure a weathertight installation.
2. At the juncture of the roof and vertical surfaces, flashing and counterflashing shall be provided per the roofing manufacturer’s instruction.
FINISHING
1. SIDING offers both a fade resistant colored cap stock material that does not require painting, and a white capstock material for custom color painting.
2. SIDING can be painted utilizing “vinyl-safe” paint of LRV 54 or lower. Prior to painting, make sure that the surface area is properly cleaned. Please refer to the paint manufacturers’ specifications & follow their instructions for paint applications.
3. It is recommended that high performance exterior-grade caulk or sealant that meets ASTM Standard C-920 be used to seal gaps around windows, doors, corners, and other exterior joints or gaps that are exposed to potential water intrusion.
Do not caulk areas that will prevent moisture from escaping the Wall cavity (e.g. under windows and around flashing). Caulking material should be compatible with both SIDING and the materials to be caulked. It is also recommended that you inspect your caulking on a regular basis, as caulking may fail and trap water, creating moisture issues.
CARE AND MAINTENANCE
1. Use a mixture of water and either a mild detergent products or a mild household cleaner to clean SIDING. A cloth or soft fabric is preferable for wiping down and/or drying.
2. SIDING can also be power washed (on a low setting) to remove dust or debris.
3. Remove mold/mildew using a mild commercial mold/mildew remover.